|
|
|
A virtual server is a type of virtual machine which provides the functionality needed to execute an entire operating system configured to operate as a network server. A virtual server is executed, just like any other software application, on a physical computer - the virtual server host. The virtual server host shares its physical hardware between multiple virtual server environments which are logically isolated from one another, yet exist on the same physical machine.
The Department of Computing provides a virtual server host called myserver.doc.gold.ac.uk for running virtual servers. Students taking relevant courses provided by the Department of Computing may be granted the necessary permissions to create a virtual server. You will have full administrator access to your virtual server, allowing you to install and run any software you like.
Two interfaces are available for managing virtual servers on myserver.doc.gold.ac.uk, the virtual server host:
Web interface - using the Virtual Server Manager page on the Department of Computing Intranet.
Command-line interface - using the myserver command on host doc.gold.ac.uk, the Department of Computing's open access server (see below).
The following sections describe the use of virtual servers on myserver.doc.gold.ac.uk and the network environment in which they operate.
The Campus firewall is like a wall around the Campus network that blocks direct access from the internet to all computers on the Campus network by default. Servers on the Campus network which can be directly accessed from the internet, such as doc.gold.ac.uk, have rules added to the firewall that allow incoming internet traffic to reach them. The rules open specific 'ports' which act like numbered doorways in the wall, allowing traffic for those ports to pass through to a specific host computer. Host doc.gold.ac.uk, for example, has rules in the firewall to allow incoming network traffic for ports 22 (ssh), 80 (http) and 443 (https).
The virtual server host, myserver.doc.gold.ac.uk, does not have any open ports in the firewall. This means that the virtual server host, and thus the virtual servers themselves, cannot be accessed directly from the internet. They can only be accessed directly from a computer connected to the Campus network. In order to connect to a virtual server from the internet, your connection must be relayed via another computer that is connected to the Campus network and has internet access allowed by the Campus firewall (such as doc.gold.ac.uk).
In a similar way, virtual servers run on a private network which is separated from the Campus network. This virtual network-within-a-network really only exists on myserver.doc.gold.ac.uk, the virtual server host. Other computers on the Campus network (or the internet) cannot connect directly to a virtual server. They can only connect to a virtual server through the virtual server host. The virtual server host thus acts as a gateway to the private network.
Each virtual server is assigned a private network address in the 192.168.0.0 to 192.168.255.255 Internet Protocol (IP) address range. This private network address is only valid within the private network. When a virtual server sends network traffic out of the private network to a computer on the Campus network or the internet, the private network address is translated into a public IP address by the virtual server host - a process called Network Address Translation (NAT). The virtual server host replaces the private network address of the virtual server in the outgoing IP data packets with its own public IP address and then forwards the packets on to the target computer. The computer receiving the data can send a response back to the virtual server without needing to know its private network address. It just sends the response back to the virtual server host using its public IP address. The virtual server host translates the public address back into the private network address and then forwards the data packets on to the virtual server. This process gives the virtual servers access to the internet.
A virtual server has full access to the internet but can only be accessed directly from another virtual server on the private network, or from the virtual server host. To make a virtual server accessible from a computer outside the private network, network traffic has to be forwarded to specific ports on the virtual server via paired ports on the virtual server host. This is like creating a tunnel between the virtual server host and a virtual server, where network traffic sent to a port on the virtual server host ends up at a (potentially different) port on the virtual server. By forwarding incoming traffic received on its own ports to ports on the virtual servers, the virtual server host acts as a bridge between the private network and the outside world.
Virtual servers can have ID numbers in the range 0 to 999, providing an addressable range of up to 1000 virtual servers. To make one port (eg. HTTP port 80) on each virtual server accessible from outside the private network, a contiguous block of 1000 ports on myserver.doc.gold.ac.uk, the virtual server host, is configured for port forwarding (eg. 8000-8999). There is a one-to-one mapping between each port in the block and the target port on one particular virtual server. The specific port in the block that is allocated to each virtual server is determined by the server ID number. Each virtual server has three ports configured for forwarding on myserver.doc.gold.ac.uk:
| Virtual Server Port | Port on myserver for Server ID | Usage |
|---|---|---|
| 22 | 2000+ID | Normally used to run an SSH service. |
| 80 | 8000+ID | Normally used to run an HTTP (web) service. |
| 8000 | 58000+ID | May be used to run any custom server program as a normal (non-root) user on a virtual server. |
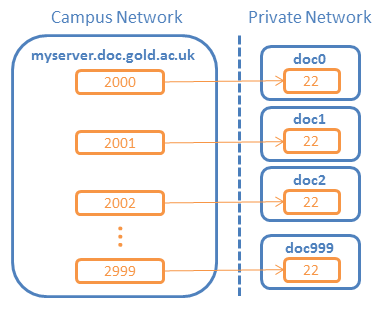
Fig1 shows the port forwarding setup on myserver.doc.gold.ac.uk for accessing port 22 (SSH) on each virtual server. As shown in the diagram:
Port 2000 on host myserver.doc.gold.ac.uk forwards to port 22 on the first virtual server (doc0)
Port 2001 on host myserver.doc.gold.ac.uk forwards to port 22 on the second virtual server (doc1)
etc...
A similar port-forwarding setup exists for HTTP port 80 (on myserver ports 8000-8999) and for custom user port 8000 (on myserver ports 58000-58999) on each virtual server.
A computer on the Campus network can connect to a virtual server by connecting directly to a port on myserver.doc.gold.ac.uk which forwards to that particular virtual server. For example, to connect to SSH port 22 on a virtual server with ID 999, you would configure your SSH client to connect to host myserver.doc.gold.ac.uk on port 2999 (2000+999). To connect to HTTP port 80 on a virtual server with ID 999 using a web browser, you would connect to port 8999 (8000+999) on host myserver.doc.gold.ac.uk using the URL http://myserver.doc.gold.ac.uk:8999/
Note that the port-forwarding setup from myserver.doc.gold.ac.uk to a virtual server does not actually care whether the virtual server is in fact running an SSH service on port 22 or an HTTP service on port 80. Likewise, it does not care what kind of service is actually running on user port 8000, if any. It will just accept any TCP/IP network traffic that is sent to the ports assigned to a virtual server on myserver.doc.gold.ac.uk and forward it to their respective ports on the virtual server. You could run an HTTP service on port 22, an SSH service on port 80 or an echo server on port 8000 and port-forwarding will work correctly, as long as you use the appropriate client program for connecting to whatever service is actually running on those ports. This contrasts with the virtual server HTTP proxy (see below), which expects to receive requests which use the HTTP protocol (such as a request from a web browser).
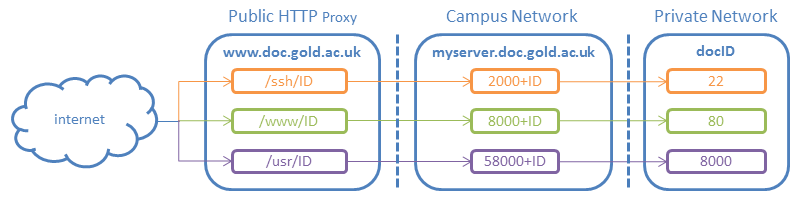
To connect to a virtual server using an HTTP client, such as a web browser, you can use the HTTP proxy provided by the web server www.doc.gold.ac.uk. The HTTP proxy accepts HTTP and HTTPS requests and forwards them to a HTTP (web) server on a virtual server. The virtual server ID and the virtual server port number to connect to are specified in the URL path of the request. The first element of the URL path identifies the port number on the virtual server to connect to and is one of /ssh/ (port 22), /www/ (port 80) or /usr/ (port 8000). The second element of the URL path is the virtual server ID number (0-999). So, the HTTP proxy URLs for a virtual server with a particular server ID are:
http://www.doc.gold.ac.uk/ssh/ID/ → docID:22
http://www.doc.gold.ac.uk/www/ID/ → docID:80
http://www.doc.gold.ac.uk/usr/ID/ → docID:8000
Note that for all ports other than port 22 (SSH), the HTTP proxy expects that the service running on the destination port on the virtual server will accept HTTP requests. If there is no HTTP service (such as a web server) running on that port on the virtual server, the HTTP proxy will be unable to forward incoming HTTP requests to that port. The HTTP proxy is able to forward a connection to an SSH service on port 22 of a virtual server because it is specially configured to use an SSH client which runs in an HTTP server to make connections on that port.
Fig2 illustrates the routing of internet traffic via the HTTP proxy www.doc.gold.ac.uk to ports on a virtual server. The bar between www.doc.gold.ac.uk and myserver.doc.gold.ac.uk represents the Campus firewall protecting the Campus network. The bar between myserver.doc.gold.ac.uk and docID (the virtual server) represents the separation of the private network from the Campus network. ID is the ID number assigned to the virtual server (0-999).
From a computer connected to the Campus network, you can connect directly to the SSH port for your virtual server on host myserver.doc.gold.ac.uk. For example, using command-line ssh to connect as user jbond007 to server ID 123 via myserver port 2123:
ssh jbond007@myserver.doc.gold.ac.uk -p2123
To connect to the SSH port on a virtual server from the internet, first login to doc.gold.ac.uk and then ssh to the virtual server from there. For example, using command-line ssh in a terminal window, user jbond007 on doc.gold.ac.uk could use a command like the following to connect to doc.gold.ac.uk:
ssh jbond007@doc.gold.ac.uk
... and then connect to their virtual server (assuming the same username as on doc.gold.ac.uk):
ssh myserver -p2123
... or, with a different username (eg. 'otheruser'):
ssh otheruser@myserver -p2123
Note that from doc.gold.ac.uk you do not need to specify the full hostname for myserver (myserver.doc.gold.ac.uk), as doc uses the domain doc.gold.ac.uk with server names by default.
It is also possible to combine this two-step connnection from the internet via doc.gold.ac.uk to virtual server ID 123 as user 'otheruser' into one command:
ssh -t jbond007@doc.gold.ac.uk ssh otheruser@myserver -p2123
Using PuTTY, the Windows SSH client, you can configure a session to implement the two-step connection by specifying an ssh command to be executed automatically after connecting to doc.
On the "Session" page, enter the hostname doc.gold.ac.uk and the (default) ssh port 22
On the "Connection-SSH" page, enter a remote command to connect to your virtual server - eg. for user 'otheruser' on server ID 123:
ssh otheruser@myserver -p2123
After setting the remote command, you can go ahead and open the connection. You will first be asked to login to doc (using your normal campus username and password) and should then be presented with the login prompt from your virtual server. You could simplify this process by installing your Putty SSH key in your doc account and installing your OpenSSH key from doc in your virtual server account.
A more flexible way to connect to a virtual server from your own computer is by setting up an SSH tunnel. Using an SSH tunnel, you can link a port on your computer to one of the ports that are forwarded to a virtual server by the virtual server host. You can then use the tunnel to connect a client running on your computer to a service running on the virtual server. The client could be an ssh or scp command connecting to the SSH server on port 22, a web browser connecting to a web server on port 80, or maybe a database administration client connecting to a database server on port 8000.
In order to set up an SSH tunnel to a virtual server, you need an SSH proxy server which will accept ssh connections from the internet and forward them to the virtual server host. The SSH proxy server is the mid-point in your SSH tunnel, passing on the requests received from your computer to the virtual server and sending back the responses from the virtual server to your computer. The Department of Computing server doc.gold.ac.uk can be used for setting up an SSH tunnel to a virtual server. You will need to login to an account on doc.gold.ac.uk in order to set up an SSH tunnel.
The command-line ssh program can be used to set up an SSH tunnel. The ssh '-L' option is used to specify the source port (on your computer) and the destination hostname and port. The '-N' option may also be included to prevent the ssh client from opening a command-line on the server as it would normally do, since a command-line is not needed for an SSH tunnel.
For example, the following sets up a tunnel from port 9999 on your computer via user jbond007 on doc.gold.ac.uk to port 2123 on virtual server host myserver:
ssh -N -L 9999:myserver:2123 jbond007@doc.gold.ac.uk
As described in the section on 'Virtual Server Ports' (above), the port range 2000 to 2999 is reserved on the virtual server host for forwarding to port 22 on virtual servers 0 to 999. So, connecting your tunnel to port 2123 on myserver effectively connects it to port 22 (normally the SSH server) on virtual server 123.
After running the ssh command to set up the tunnel and logging into doc.gold.ac.uk, you can minimize the terminal window. Your SSH tunnel will remain open until you terminate the ssh tunnel command. If the -N option was included in the SSH tunnel command, the command can be terminated by either typing Ctrl-C or just closing the terminal window. If the -N option was not included in the SSH tunnel command, you can either type Ctrl-D or enter 'exit' on the SSH tunnel command-line to close the tunnel and terminate the command.
With the SSH tunnel open, you could then open another terminal window and ssh to port 9999 on your computer (localhost) to connect directly to the SSH server running on virtual server 123:
ssh -p9999 jbond007@localhost
PuTTY, the Windows SSH client, can be used to set up an SSH tunnel to a virtual server. For example, to set up a tunnel from local port 9999 via doc.gold.ac.uk to port 8000 on virtual server 123 (equivalent to the command-line ssh tunnel above):
On the "Session" page, enter the hostname doc.gold.ac.uk and the (default) ssh port 22.
On the "Connection-SSH-Tunnels" page, enter 9999 in the 'Source port' box and myserver:58123 in the 'Destination' box and then click on the 'Add' button.
On the "Connection-SSH" page, (optionally) tick "Don't start a shell or command at all".
With the above settings configured, you can click on the 'Open' button and login using your username and password for the doc.gold.ac.uk server. The SSH tunnel is then ready for use.
With your command-line or PuTTY ssh tunnel up and running (see above), you can open a new terminal window and use the scp command (if it is installed on your system) to copy files to or from the virtual server. For example, to copy FILENAME from the virtual server to your computer:
scp -P 9999 jbond007@localhost:FILENAME .
To copy FILENAME from your computer to the virtual server:
scp -P 9999 FILENAME jbond007@localhost:.
You can also use a graphical file transfer program, such as FileZilla or Cyberduck, to copy files to and from your virtual server via your SSH tunnel. You will need to configure the file transfer program to use the SFTP protocol and the port number that you used for your SSH tunnel. How you do that depends on the file transfer program that you are using. For example, assuming your SSH tunnel is running on port 9999:
Just as you can set up a tunnel to the SSH server running on a virtual server, you can also set up a tunnel to the web server running on a virtual server. The port range 8000 to 8999 is forwarded to port 80 (normally the web server) on virtual servers 0 to 999. So, the following would connect port 9999 on your computer to a web server running on virtual server 123:
ssh -N -L 9999:myserver:8123 jbond007@doc.gold.ac.uk
With that tunnel open, you could open the following URL in your web browser:
http://localhost:9999/
Likewise, you can set up an SSH tunnel to whatever is running on port 8000 on a virtual server. The port range 58000 to 58999 is forwarded to port 8000 on virtual servers 0 to 999. So, the following would connect port 9999 on your computer to whatever is running on port 8000 on virtual server 123 (eg. a database server):
ssh -N -L 9999:myserver:58123 jbond007@doc.gold.ac.uk
If a database server was running on port 8000 on your virtual server, you would then configure the database client on your computer to connect to port 9999 on localhost.
The command-line interface myserver on host doc.gold.ac.uk can be used to create, start, stop and destroy virtual servers. Run the myserver command without parameters for full usage info. The following describes basic command usage.
To create a basic server with default settings, ssh to host doc.gold.ac.uk and enter the following command:
myserver create
As with all myserver commands, you will first be asked for the password for your doc login. Your server will then be created - if all goes well, this should take around 20 seconds.
The following command will list various details about your virtual servers:
myserver list
If, for example, your username was jbond007 and you had created server ID 123, the output might look something like this:
 ID   OWNER     ADMIN     SYSTEM    TYPE       DISK  MEM   CPUS  SSH   WWW   USR    STATUS    NOTES
 123  jbond007  jbond007  ubuntu16  minimal    5G    512   1     2123  8123  58123  running
Each column in the output describes one property of a virtual server. The following describes the basic properties that are relevant for connecting to your server.
The ID column shows the server ID, a number between 0 and 999. The server ID is used to refer to the server in other myserver commands. When you create a server without specifying a server ID, the next available server ID will be assigned to your server.
The SSH column shows the port number on host myserver.doc.gold.ac.uk that you can use to connect to your server using an ssh client. The ADMIN column shows the username of the admin user for your server, which by default is your username on doc. The admin user can use the sudo command to run administrative commands on the server. The default password for the admin user is the admin username, which you will be required to change immediately on your first login.
If, as in the above example, your server ID were 123, the SSH port number for your virtual server on myserver.doc.gold.ac.uk would be 2123. The following ssh command would connect you to the server from any computer on the Campus network:
ssh myserver.doc.gold.ac.uk -p2123
From host doc.gold.ac.uk, the domain doc.gold.ac.uk is implied for server names by default, so you could use this shorter command instead:
ssh myserver -p2123
Alternatively, you could use an even shorter myserver command to connect to the server from doc, specifying the server ID instead of the port number:
myserver ssh 123
The following examples all assume server ID 123 - when using these commands, replace 123 with your own server ID.
To gracefully shut down the server:
myserver stop 123
If the server has crashed or become unresponsive for some reason, you can force it to shut down using the 'kill' command, which is analogous to pulling the plug on a real computer:
myserver kill 123
To start the server, if it is not currently running:
myserver start 123
To permanently delete server 123:
myserver drop 123
When a server is deleted, the server ID is returned to the pool of available server ID numbers and may be reassigned to another virtual server.
This section describes solutions for common problems encountered while using virtual servers.
If you have created a virtual server and connected to it using the ssh command and then destroyed that virtual server and created a new one with the same host ID, you may see a message similar to the following when you try to connect to the new server using the ssh command:
@@@@@@@@@@@@@@@@@@@@@@@@@@@@@@@@@@@@@@@@@@@@@@@@@@@@@@@@@@@
@    WARNING: REMOTE HOST IDENTIFICATION HAS CHANGED!     @
@@@@@@@@@@@@@@@@@@@@@@@@@@@@@@@@@@@@@@@@@@@@@@@@@@@@@@@@@@@
IT IS POSSIBLE THAT SOMEONE IS DOING SOMETHING NASTY!
Someone could be eavesdropping on you right now (man-in-the-middle attack)!
It is also possible that a host key has just been changed.
The fingerprint for the ECDSA key sent by the remote host is
SHA256:gCsW9QIZJs2L6YoKu9lOo1V749Wjh6TeY6wSjUqEm/U.
Please contact your system administrator.
Add correct host key in /home/jbond007/.ssh/known_hosts to get rid of this message.
Offending ECDSA key in /home/jbond007/.ssh/known_hosts:1
ECDSA host key for [myserver.doc.gold.ac.uk]:2099 has changed and you have requested strict checking.
Host key verification failed.
When a new virtual server (or any server) is created, it generates a unique identification code for itself called a "host key".
When you first connect to the server using the ssh command,
the server sends its host key to your computer and your computer stores the host key for future reference.
The next time you connect to the same server, the host key received from the server is compared with the host key that was stored previously.
If the received host key does not match the stored host key, a message like the one above is printed to alert you that the host key has changed.
In theory, this could mean that a hacker has set up a fake server with the same ID as your virtual server in order to impersonate your server.
This is known as a "man-in-the-middle" attack.
However, this host key mismatch also occurs when you destroy a virtual server and create a new one with the same ID, since the new server will always have a different host key. The solution in that case is to remove the old host key that is stored on your computer.
You can use the ssh-keygen command to remove an old host key.
To identify the host key to remove, you need to specify the host ID with the ssh-keygen command.
Look for the line in the warning message that says:
... host key for XXX has changed ...... where XXX is the host ID.
For example, the host ID in the example message above is:
[myserver.doc.gold.ac.uk]:2099
So, using the example above, the following would remove the offending host key:
ssh-keygen -R [myserver.doc.gold.ac.uk]:2099
After running the above command, the ssh command would then allow you to connect and accept the new host key for the server.
You may encounter the host key verification problem when you are using the two-step ssh login from the internet to your virtual server via the doc.gold.ac.uk server (see Virtual Server SSH Access above).
In that case, the old host key that is stored on doc.gold.ac.uk won't allow you to connect to your virtual server from there until it is removed.
The following example shows a command you could run on your computer to connect to doc.gold.ac.uk as user jbond007 to remove an old host key for virtual server 999:
ssh jbond007@doc.gold.ac.uk ssh-keygen -R [myserver]:2999
You could then connect as normal to virtual server 999 via user jbond007 on doc.gold.ac.uk:
ssh -t jbond007@doc.gold.ac.uk myserver ssh 999
During that first connection, you (as user jbond007 on doc.gold.ac.uk) would be asked to accept the new host key from virtual server 999. The new host key would then be stored on doc.gold.ac.uk and the connection to virtual server 999 would proceed.
